How to Upload an Excel File to Sharepoint
You can publish a workbook to a Microsoft SharePoint library so that people can view or edit information technology in a web browser without needing Excel installed on their computers. Publishing is essentially the same as saving, but with some built-in options that let you control what people can see when they open the workbook in a browser.
Adopting an organization-wide practice of saving or publishing a workbook to a central SharePoint site tin can help yous ensure that slightly different versions of the same workbook don't offset popping upward all over your arrangement when it's sent around in email.
Past setting some publish options, y'all can emphasize specific parts of your workbook, such every bit charts, or exclude other parts from beingness viewed in the browser. For case, you tin show a nautical chart but non its underlying data. Or, you can show but certain worksheets to those people who demand to see them and hide the other worksheets.
This article shows you how to publish a workbook from Excel for Windows and does not cover connecting a workbook or workbook data to an Excel Web Access Web Office on a SharePoint folio.
When you publish a workbook to a SharePoint site, the entire workbook is saved to SharePoint. A user with the needed SharePoint permissions can view and piece of work with the unabridged workbook either in the browser or in the Excel desktop programme.
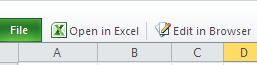
If Role for the web is deployed on SharePoint, viewing and working with your information in the browser tin can be very much like working with your data in the Excel desktop program. In fact, dissimilar the Excel desktop program, multiple users can simultaneously edit a workbook in the browser filigree. When y'all view a workbook in the browser, if the Edit in Excel Online push button is visible, y'all'll know that Office for the web is set to employ.

Prepare the workbook
Before you publish the workbook, yous can cull to select only the worksheets or items that you want visible in the browser. Just remember that although you can limit what is viewable in this mode, the entire contents of the workbook are notwithstanding saved to the SharePoint server.
If you want to include entire worksheets as an item in addition to other items, such equally charts or PivotTables, ascertain the entire worksheet equally a named range. Select the entire worksheet, and and then define a named range. This named range will then appear as an available particular in the Publish Options dialog box when y'all are gear up to publish.
To let users enter a value in a prison cell to piece of work with a formula in another cell, ready that cell equally a divers name in Excel before you publish the workbook. You lot tin then add that defined proper noun as a parameter on the Parameters tab in the Browser View Options dialog box.
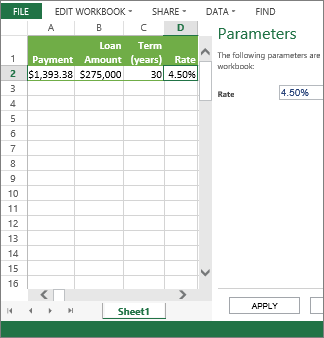
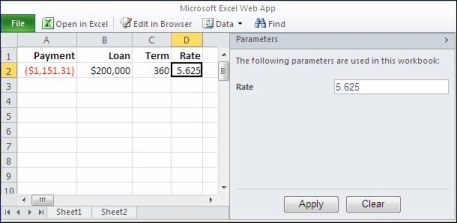
For example, the post-obit shows a cell D2, that has the defined name "Rate." In the browser, a user enters a value of 5.625 in the Charge per unit box in the Parameters pane, and then clicks Apply. That value then appears in prison cell D2, and the formula in A2 uses the value in D2. The result of the formula is recalculated, and shown in A2: $1,151.31.
Notation:If you create slicers for an Excel table and ascertain a name for the range of cells containing the table and slicers, y'all won't be able to apply the slicers to filter the table in the browser if you lot publish the divers range. If yous publish the table or the entire worksheet or its workbook, the slicers will work as expected in the browser.
Publish the workbook
-
Click the File tab, click Salve Equally, and and then click SharePoint.
-
If you see your SharePoint folder nether Current, Recent, or Older, click the folder you desire.
The Salve Equally dialog box appears.
Otherwise, click Scan, enter the web address for the SharePoint site, and then browse to the folder where you lot want to publish the workbook.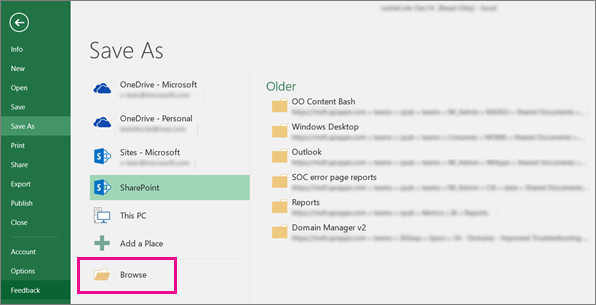
-
To select individual worksheets or items to publish from the workbook, click Browser View Options.
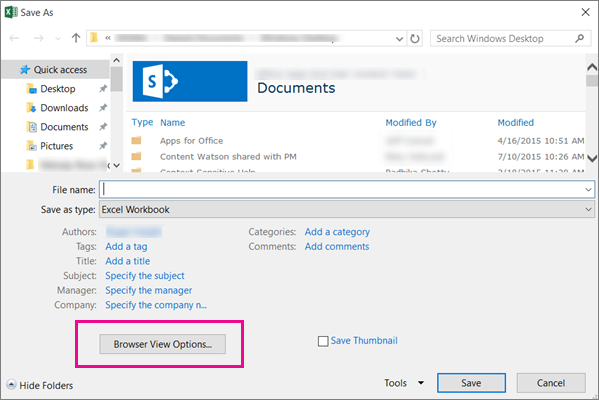
You'll see the Show tab and the Parameters tab.
-
If you just want to publish the entire workbook, click Salve. Otherwise, exercise one of the following:
-
To show the entire workbook in the browser, on the Show tab, select Entire Workbook in the list box.
-
To bear witness only specific worksheets in the browser, on the Evidence tab, select Sheets in the list box, and so clear the check boxes for the sheets y'all don't want hidden in the browser.
By default, all sheets are selected. To quickly make all sheets viewable later you unselected some of the check boxes, select the All Sheets bank check box.
-
To evidence only specific items in the browser (such as named ranges, charts, tables, or PivotTables), on the Show tab, select Items in the Workbook in the list box, and then select the check boxes for the items that you want to show.
-
On the Parameters tab, add whatever defined names you lot want to utilise to specify cells that are editable when users view the workbook in the browser, and so click OK.
-
-
Save the workbook.
Notes:
-
If you lot select items that take the aforementioned name (such as a chart and its underlying table of data), only one of these items will be available in the browser. To show all the items, make sure that each particular in the workbook has a unique name.
-
You can rename tables on the Pattern tab in the Properties group, rename PivotTables on the Options tab in the PivotTable group, and rename charts or PivotCharts on the Layout tab in the Properties group. Rename other duplicate items, such as named ranges on the Formulas tab in the Defined Names group.
If Office for the web is deployed on SharePoint, viewing and working with your information in the browser can be very much like working with your data in the Excel desktop program. In fact, different the Excel desktop program, multiple users can simultaneously edit a workbook in the browser filigree. When you view a workbook in the browser, if the Edit in Excel Online button is visible, y'all'll know that Part for the web is set up to use.
For more data, see the article Differences between using a workbook in Excel and Excel Services.
Prepare the workbook
Before you publish the workbook, you can choose to select simply the worksheets or items that you want visible in the browser. Only retrieve that although you can limit what is viewable in this way, the entire contents of the workbook are however saved to the SharePoint server.
If you want to include entire worksheets equally an item in addition to other items, such equally charts or PivotTables, define the unabridged worksheet equally a named range. Select the entire worksheet, and then ascertain a named range. This named range volition then announced as an available detail in the Publish Options dialog box when yous are ready to publish.
To let users enter a value in a cell to piece of work with a formula in some other cell, ready that cell as a divers proper name in Excel before you publish the workbook. You can so add that defined proper noun as a parameter on the Parameters tab in the Browser View Options dialog box.
For case, the following shows a cell D2, that has the divers name "Rate." In the browser, a user enters a value, 5.625, in the box in the Parameters pane and clicks Apply. That value and then appears in prison cell D2, and the formula in A2 uses the value in D2. The result of the formula is recalculated, and shown in A2: $ane,151.31.
Encounter Excel Assist for data about how to define ranges.
Note:If you create slicers for an Excel table and define a name for the range of cells containing the table and slicers, y'all won't be able to use the slicers to filter the table in the browser if y'all publish the defined range. If y'all publish the table or the entire worksheet or its workbook, the slicers will work equally expected in the browser.
Publish the workbook
-
Click File > Salvage Equally >SharePoint.
-
If you see your SharePoint folder underCurrent Folder or Recent Folders, click the folder you want. Otherwise, click Browse and enter the web accost for the SharePoint site. And then, browse to the folder where you lot want to publish the workbook. The Relieve As dialog box appears.
-
To select individual worksheets or items to publish from the workbook, click Browser View Options. You lot'll see a Show tab and a Parameters tab. If you just desire to publish the entire workbook, click Save. Otherwise, do i of the following:
-
To show the entire workbook in the browser, on the Show tab, select Entire Workbook in the list box.
-
To show just specific worksheets in the browser, on the Show tab, select Sheets in the list box, and and so uncheck the boxes for the sheets you don't desire subconscious in the browser.
By default, all sheets are selected. To chop-chop make all sheets viewable again afterward y'all uncheck some of the boxes, select the All Sheets bank check box.
-
To prove only specific items in the browser (such as named ranges, charts, tables, or PivotTables), on the Show tab, select Items in the Workbook in the listing box, and then cheque the boxes for the items that you want to show.
-
On the Parameters tab, add any defined names you want to utilize to specify cells that are editable when users view the workbook in the browser. So click OK to close the dialog box.
-
-
Salvage the workbook.
Notes:
-
If you select items that take the same name (such equally a nautical chart and its underlying table of data), but one of these items will be available in the browser. To show all the items, make sure that each item in the workbook has a unique proper name.
-
If you select items that take the aforementioned name (such as a chart and its underlying tabular array of data), only 1 of these items will be available in the browser. To evidence all the items, make sure that each detail in the workbook has a unique proper noun.
-
You can rename tables on the Blueprint tab in the Backdrop grouping, rename PivotTables on the Options tab in the PivotTable grouping, and rename charts or PivotCharts on the Layout tab in the Properties group. Rename other duplicate items, such as named ranges on the Formulas tab in the Defined Names group.
-
You can rename tables on the Design tab in the Backdrop grouping, rename PivotTables on the Options tab in the PivotTable group, and rename charts or PivotCharts on the Layout tab in the Properties group. Rename other duplicate items, such every bit named ranges on the Formulas tab in the Defined Names group.
For more information almost Excel Web Access spider web parts, see the article Display a workbook in an Excel Web Access web office.
When you publish a workbook to a SharePoint server, the entire contents of the workbook are saved to the server and can be viewed and worked with if you open up the workbook in the Excel desktop program. If Office Web Apps are deployed on the SharePoint server, viewing and working with your information in the spider web browser can be very much similar working with your data in the Excel desktop program. In fact, simultaneous editing of a workbook is possible in the browser filigree when Role Spider web Apps are deployed. When you view a workbook in the browser, if the Edit in Browser button is visible, this means that Office Web Apps are available.
For more information, run into the article Differences between using a workbook in Excel and Excel Services.
Prepare the workbook
Before you publish the workbook, you have the opportunity (in the Publish Options dialog box) to select the worksheets or items that you desire visible in the browser when editing has non been enabled by clicking the Edit in Browser button. Just call back that although you can select what is viewable in this mode, the unabridged contents of the workbook are still saved to the SharePoint server.
If you want to include unabridged worksheets as an particular in improver to other items, such as charts or PivotTables, ascertain the entire worksheet as a named range. Select the entire worksheet, so define a named range. This named range volition then appear every bit an available item in the Publish Options dialog box when you are ready to publish.
If you desire to allow users to provide a parameter to a formula when viewing a worksheet in a browser, fix a cell as a defined name. You can then add that defined name as a parameter on the Parameters tab in the Publish Options dialog box.
For example, in the following graphic that shows a worksheet in the browser, prison cell D2 has the defined name Rate. In the browser, a user has entered a value, 5.625, in the box in the Parameters pane and then clicked Apply. That value then appears in cell D2, and the formula in A2 uses the value in D2. The upshot of the formula is recalculated, and shown in A2: $1,151.31.
See Excel Help for information nigh how to define ranges.
Publish the workbook
-
Click the File tab, and and so click Save & Send.
-
Click Save to SharePoint.
Notation If the Salvage to SharePoint control is unavailable, you tin can still save the workbook to a SharePoint site by using the Save Equally control. The Publish Options dialog box will not be available. You can likewise direct upload the workbook from a SharePoint library. Users can view and edit the contents of the workbook in the browser by going directly to the site where the workbook is saved.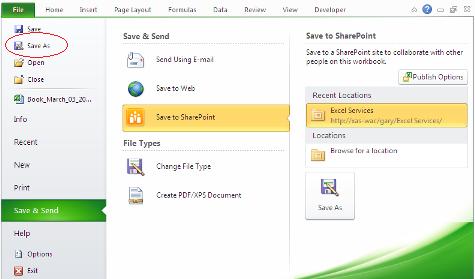
-
If you want to select individual worksheets or items to publish in the workbook, click the Publish Options button. Otherwise, if you want to publish the unabridged workbook, skip directly to step iv.
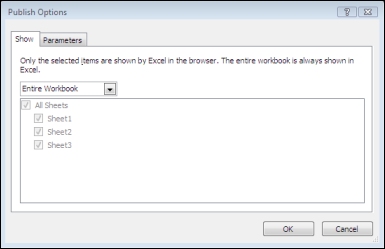
On the Testify tab, exercise the following:-
To bear witness the entire workbook in the browser, select Entire Workbook in the listing box.
-
To bear witness only specific worksheets in the browser, select Sheets in the list box, and and so clear the check boxes for the sheets that you practice non want to brand visible.
Note By default, all sheets are selected. To chop-chop make all sheets viewable over again afterward you clear some of the check boxes, yous tin can select the All Sheets check box. -
To show only specific items in the browser (such as named ranges, charts, tables, or PivotTables), select Items in the Workbook in the list box, and then select the check boxes of the items that you desire to testify.
Notation If you select items that have the aforementioned name (such as a chart and its underlying tabular array of data), only one of these items will exist bachelor in the browser. To show all the items, you must brand sure that each item in the workbook has a unique name. Yous can rename tables on the Pattern tab in the Properties grouping, rename PivotTables on the Options tab in the PivotTable group, and rename charts or PivotCharts on the Layout tab in the Backdrop group. Duplicate items, such as named ranges, can exist renamed on the Formulas tab in the Defined Names group.
-
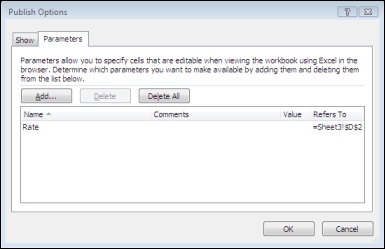
On the Parameters tab, add together whatever defined names that you lot desire to use to specify cells that are editable when users view the workbook in the browser. Then click OK to shut the dialog box.
-
-
Choose a location in which to publish your workbook.
There may already be saved server locations under Current Location, Recent Locations, or Locations from which you can choose. If in that location are no such locations, or you desire to save to a new location, nether Locations, double-click Browse for a location. -
In the Save As dialog box, enter the spider web address for the SharePoint site, and so browse to the site or library in which you lot desire to save your workbook.
-
If y'all haven't already selected individual worksheets or items or set parameters, click the Publish Options button.
-
In the File name box, accept the suggested name for the workbook, or type a new name if you desire.
-
To display the workbook contents in a browser window immediately after the publish performance has completed, brand sure the Open up with Excel in the browser check box is selected.
-
Click Relieve.
Source: https://support.microsoft.com/en-us/office/publish-a-workbook-to-a-sharepoint-site-in-excel-for-windows-77ee880f-8928-4283-bc01-e0d49e3f360b
0 Response to "How to Upload an Excel File to Sharepoint"
Post a Comment